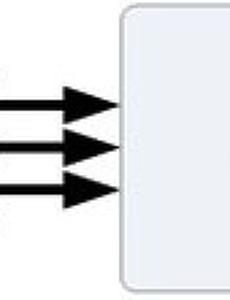
출처 : http://www.brekel.com/?page_id=671

Kinect SDK에 대하여 찾던 중 OpenNI라는 것을 알게 되었다.
MS에서 공개한 SDK 베타버전과 OpenNI에 대한 비교는 다음과 같다.

둘다 각각 장단점이 존재 한다.
Kinect SDK와 OpenNI를 연동시키는 것도 존재한다고 하니 좀 더 찾아봐야 겠다.

Microsoft’s Kinect SDK (Beta)
pro:

  • support for audio
  • support for motor/tilt
  • full body tracking:
    • does not need a calibration pose
    • includes head, hands, feet, clavicles
    • seems to deal better with occluded joints
  • supports multiple sensors
  • single no-fuss installer
  • SDK has events for when a new Video or new Depth frame is available

con:

  • licensed for non-commercial use only
  • only tracks full body (no mode for hand only tracking)
  • does not offer alignment of the color&depth image streams to one another yet
    • although there are features to align individual coordinates
    • and there are hints that support may come later
  • full body tracking:
    • only calculates positions for the joints, not rotations
    • only tracks the full body, no upperbody or hands only mode
    • seems to consume more CPU power than OpenNI/NITE (not properly benchmarked)
  • no gesture recognition system
  • no support for the PrimeSense and the ASUS WAVI Xtion sensors? (can anyone confirm this?)
  • only supports Win7 (x86 & x64)
  • no support for Unity3D game engine
  • no built in support for record/playback to disk
  • no support to stream the raw InfraRed video data
  • SDK does not have events for when new user enters frame, leaves frame etc


PrimeSense OpenNI/NITE

pro:

  • license includes commercial use
  • includes a framework for hand tracking
  • includes a framework for hand gesture recognition
  • can automatically align the depth image stream to the color image
  • full body tracking:
    • also calculates rotations for the joints
    • support for hands only mode
    • seems to consume less CPU power than Microsoft Kinect SDK’s tracker (not properly benchmarked)
  • also supports the Primesense and the ASUS WAVI Xtion sensors
  • supports multiple sensors although setup and enumeration is a bit quirky
  • supports Windows (including Vista&XP), Linux and Mac OSX
  • comes with code for full support in Unity3D game engine
  • support for record/playback to/from disk
  • support to stream the raw InfraRed video data
  • SDK has events for when new User enters frame, leaves frame etc

con:

  • no support for audio
  • no support for motor/tilt (although you can simultaneously use the CL-NUI motor drivers)
  • full body tracking:
    • lacks rotations for the head, hands, feet, clavicles
    • needs a calibration pose to start tracking (although it can be saved/loaded to/from disk for reuse)
    • occluded joints are not estimated
  • supports multiple sensors although setup and enumeration is a bit quirky
  • three separate installers and a NITE license string (although the process can be automated with my auto driver installer)
  • SDK does not have events for when new Video or new Depth frames is available

저작자 표시 비영리 동일 조건 변경 허락
크리에이티브 커먼즈 라이선스
Creative Commons License
posted by deviAk

Kinect for Windows Architecture

The SDK provides a sophisticated software library and tools to help developers use the rich form of Kinect-based natural input, sensing and reacting to real-world events.

The Kinect sensor and associated software library interact with your application, as shown in Figure 1.

Figure 1.  Figure 1. Hardware and software interaction with an application

The components of the SDK are shown in Figure 2.

Figure 2.  SDK Architecture

Components for the SDK shown in Figure 2 include the following:

  • Kinect hardware - The hardware components, including the Kinect sensor and the USB hub, through which the sensor is connected to the computer.
  • Microsoft Kinect drivers - The Windows 7 drivers for the Kinect sensor, which are installed as part of the SDK setup process as described in this document. The Microsoft Kinect drivers support:
    • The Kinect sensor’s microphone array as a kernel-mode audio device that you can access through the standard audio APIs in Windows.
    • Streaming image and depth data.
    • Device enumeration functions that enable an application to use more than one Kinect sensor that is connected to the computer.
  • KinectAudio DirectX Media Object (DMO) - The Kinect DMO that extends the microphone array support in Windows 7 to expose beamforming and source localization functionality.
  • Windows 7 standard APIs - The audio, speech, and media APIs in Windows 7, as described in the Windows 7 SDK and the Microsoft Speech SDK.
The NUI API

The NUI API is the core of the Kinect for Windows API. It supports fundamental image and device management features, including the following:

  • Access to the Kinect sensors that are connected to the computer.
  • Access to image and depth data streams from the Kinect image sensors.
  • Delivery of a processed version of image and depth data to support skeletal tracking. 
This SDK includes C++ and C# versions of the SkeletalViewer sample. SkeletalViewer shows how to use the NUI API in an application to capture data streams from the NUI Image camera, use skeletal images, and process sensor data. For more information, see “Skeletal Viewer Walkthrough” on the SDK website.

NUI API Initialization

The Microsoft Kinect drivers support the use of multiple Kinect sensors on a single computer. The NUI API includes functions that enumerate the sensors, so that you can determine how many sensors are connected to the machine, get the name of a particular sensor, and individually open and set streaming characteristics for each sensor.

Although the SDK supports an application using multiple Kinect sensors, only one application can use each sensor at any given time.

Sensor Enumeration and Access

C++ and managed code applications enumerate the available Kinect sensors, open a sensor, and initialize the NUI API in one of the following ways:

To initialize the NUI API and use only one Kinect sensor in a C++ application

  1. Call NuiInitialize. This function initializes the first instance of the Kinect sensor device on the system.
  2. Call other NuiXxx functions to stream image and skeleton data and manage the cameras.
  3. Call NuiShutdown when use of the Kinect sensor is complete.
To initialize the NUI API and use more than one Kinect sensor in a C++ application
  1. Call MSR_NuiDeviceCount to determine how many sensors are available.
  2. Call MSR_NuiCreateInstanceByIndex to create an instance for each sensor that the application uses. This function returns an INuiInstance interface pointer for the instance.
  3. Call INuiInstance::NuiInitialize to initialize the NUI API for the sensor.
  4. Call other methods on the INuiInstance interface to stream image and skeleton data and manage the cameras.
  5. Call INuiInstance::NuiShutdown on a sensor instance to close the NUI API when use of that sensor is complete.
  6. Call MSR_NuiDestroyInstance to destroy the instance.
To initialize the NUI API and use one Kinect sensor in managed code
  1. Create a new Runtime object and leave the parameter list empty, as in the following C# code: nui = new Runtime(); This constructor creates an object that represents the first instance of the Kinect sensor device on the system.
  2. Call Runtime.Initialize to initialize the NUI API for the sensor.
  3. Call additional methods in the managed interface to stream image and skeleton data and to manage the cameras.
  4. Call Runtime.Shutdown when use of the Kinect sensor is complete.
To initialize the NUI API and use more than one Kinect sensor in managed code
  1. Call MSR_NuiDeviceCount to determine how many sensors are available.
  2. Create a new Runtime object and pass the index of a sensor, as in the following C# code:
       nui = new Runtime(index);
  3. This constructor creates an object that represents a particular instance of the Kinect sensor device on the system.
  4. Call Runtime.Initialize to initialize the NUI API for that device instance.
  5. Call additional methods in the managed interface to stream image and skeleton data and to manage the cameras.
  6. Call Runtime.Shutdown when use of that device instance is complete.

Initialization Options

The NUI API processes data from the Kinect sensor through a multistage pipeline. At initialization, the application specifies the subsystems that it uses, so that the runtime can start the required portions of the pipeline. An application can choose one or more of the following options:

  • Color - The application streams color image data from the sensor.
  • Depth - The application streams depth image data from the sensor.
  • Depth and player index - The application streams depth data from the sensor and requires the player index that the skeleton tracking engine generates.
  • Skeleton - The application uses skeleton position data.

These options determine the valid stream types and resolutions for the application. For example, if an application does not indicate at NUI API initialization that it uses depth, it cannot later open a depth stream.

NUI Image Data Streams: An Overview

The NUI API provides the means to modify settings for the Kinect sensor array, and it enables you to access image data from the sensor array.

Stream data is delivered as a succession of still-image frames. At NUI initialization, the application identifies the steams it plans to use. It then opens those streams with additional stream-specific details, including stream resolution, image type, and the number of buffers that the runtime should use to store incoming frames. If the runtime fills all the buffers before the application retrieves and releases a frame, the runtime discards the oldest frame and reuses that buffer. As a result, it is possible for frames to be dropped. An application can request up to four buffers; two is adequate for most usage scenarios.

An application has access to the following kinds of image data from the sensor array:

  • Color data
  • Depth data
  • Player segmentation data 

Color Image Data

Color data is available in the following two formats:

  • RGB color provides 32-bit, linear X8R8G8B8-formatted color bitmaps, in sRGB color space. To work with RGB data, an application should specify a color or color_YUV image type when it opens the stream.
  • YUV color provides 16-bit, gamma-corrected linear UYVY-formatted color bitmaps, where the gamma correction in YUV space is equivalent to sRGB gamma in RGB space. Because the YUV stream uses 16 bits per pixel, this format uses less memory to hold bitmap data and allocates less buffer memory when you open the stream. To work with YUV data, your application should specify the raw YUV image type when it opens the stream. YUV data is available only at the 640x480 resolution and only at 15 FPS. 
Both color formats are computed from the same camera data, so that the YUV data and RGB data represent the same image. Choose the data format that is most convenient given your application's implementation.

The sensor array uses a USB connection to pass data to the PC, and that connection provides a given amount of bandwidth. The Bayer color image data that the sensor returns at 1280x1024 is compressed and converted to RGB before transmission to the runtime. The runtime then decompresses the data before it passes the data to your application. The use of compression makes it possible to return color data at frame rates as high as 30 FPS, but the algorithm that is used leads to some loss of image fidelity.

The sensor array uses a USB connection to pass data to the PC, and that connection provides a given amount of bandwidth. The Bayer color image data that the sensor returns at 1280x1024 is compressed and converted to RGB before transmission to the runtime. The runtime then decompresses the data before it passes the data to your application. The use of compression makes it possible to return color data at frame rates as high as 30 FPS, but the algorithm that is used leads to some loss of image fidelity.

Depth Data

The depth data stream provides frames in which each pixel represents the Cartesian distance, in millimeters, from the camera plane to the nearest object at that particular x and y coordinate in the depth sensor's field of view. The following depth data streams are available:

  • Frame size of 640×480 pixels
  • Frame size of 320×240 pixels
  • Frame size of 80×60 pixels 
Applications can process data from a depth stream to support various custom features, such as tracking users' motions or identifying background objects to ignore during application play.

The format of the depth data depends on whether the application specifies depth only or depth and player index at NUI initialization, as follows:

  • For depth only, the low-order 12 bits (bits 0?11) of each pixel contain depth data and the remaining 4 bits are unused.
  • For depth and player index, the low-order 3 bits (bits 0?2) of each pixel contain the player index and the remaining bits contain depth data. 
A depth data value of 0 indicates that no depth data is available at that position, because all the objects were either too close to the camera or too far away from it.

Player Segmentation Data

In the SDK , the Kinect system processes sensor data to identify two human figures in front of the sensor array and then creates the Player Segmentation map. This map is a bitmap in which the pixel values correspond to the player index of the person in the field of view who is closest to the camera, at that pixel position.

Although the player segmentation data is a separate logical stream, in practice the depth data and player segmentation data are merged into a single frame:

  • The 13 high-order bits of each pixel represent the distance from the depth sensor to the closest object, in millimeters.
  • The 3 low-order bits of each pixel represent the player index of the tracked player who is visible at the pixel's x and y coordinates. These bits are treated as an integer value and are not used as flags in a bit field. 
A player index value of zero indicates that no player was found at that location. Values one and two identify players. Applications commonly use player segmentation data as a mask to isolate specific users or regions of interest from the raw color and depth images.

Retrieving Image Information

Application code gets the latest frame of image data by calling a frame retrieval method and passing a buffer. If the latest frame of data is ready, it is copied into the buffer. If your code requests frames of data faster than new frames are available, you can choose whether to wait for the next frame or to return immediately and try again later. The NUI Image Camera API never provides the same frame of data more than once.

Applications can use either of the following two usage models:

  • Polling Model The polling model is the simplest option for reading data frames. First, the application code opens the image stream. It then requests a frame and specifies how long to wait for the next frame of data (between 0 and an infinite number of milliseconds). The request method returns when a new frame of data is ready or when the wait time expires, whichever comes first. Specifying an infinite wait causes the call for frame data to block and to wait as long as necessary for the next frame.

    When the request returns successfully, the new frame is ready for processing. If the time-out value is set to zero, the application code can poll for completion of a new frame while it performs other work on the same thread. A native C++ application calls NuiImageStreamOpen to open a color or depth stream and omits the optional event. Managed code calls ImageStream.Open. To poll for color and depth frames, native C++applications call NuiImageStreamGetNextFrame and managed code calls ImageStream.GetNextFrame.

  • Event Model The event model supports the ability to integrate retrieval of a skeleton frame into an application engine with more flexibility and more accuracy.

    In this model, C++ application code passes an event handle to NuiImageStreamOpen. When a new frame of image data is ready, the event is signaled. Any waiting thread wakes and gets the frame of skeleton data by calling NuiImageGetNextFrame. During this time, the event is reset by the NUI Image Camera API.

    Managed code uses the event model by hooking a Runtime.DepthFrameReady or Runtime.ImageFrameReady event to an appropriate event handler. When a new frame of data is ready, the event is signaled and the handler runs and calls ImageStream.GetNextFrame to get the frame.

NUI Skeleton Tracking

The NUI Skeleton API provides information about the location of up to two players standing in front of the Kinect sensor array, with detailed position and orientation information.

The data is provided to application code as a set of points, called skeleton positions, that compose a skeleton, as shown in Figure 3. This skeleton represents a user’s current position and pose. Applications that use skeleton data must indicate this at NUI initialization and must enable skeleton tracking.

Figure 3.  Figure 3. Skeleton joint positions relative to the human body

Retrieving Skeleton Information

Application code gets the latest frame of skeleton data in the same way that it gets a frame of image data: by calling a frame retrieval method and passing a buffer. Applications can use either a polling model or an event model, in the same way as for image frames. An application must choose one model or the other; it cannot use both models simultaneously.

To use the polling model:

  • A native C++ application calls NuiSkeletonGetNextFrame to retrieve a skeleton frame.
  • Managed code calls SkeletonEngine.GetNextFrame.
To use the event model:
  • C++ application code passes an event handle to NuiSkeletonTrackingEnable.

    When a new frame of skeleton data is ready, the event is signaled. Any waiting thread wakes and gets the frame of skeleton data by calling NuiSkeletonGetNextFrame. During this time, the event is reset by the NUI Skeleton API.

  • Managed code uses the event model by hooking a Runtime.SkeletonFrameReady event to an appropriate event handler. 
When a new frame of skeleton data is ready, the event is signaled and the handler runs and calls SkeletonEngine.GetNextFrame to get the frame.

The skeletal tracking engine processes depth frame data to calculate the floor clipping plane, which is described in “Floor Determination,” later in this document. If the application indicates at initialization that it uses skeleton tracking, the skeletal tracking engine signals a skeleton frame each time it processes the depth data, whether or not a skeleton currently appears in the frame. Applications that use the floor clipping plane values can retrieve the skeleton frame. The returned skeleton frame includes the timestamp of the corresponding depth image so that applications can match skeleton data with depth image data.

Active and Passive Skeletal Tracking

The skeletal tracking engine provides full skeletal tracking for one or two players in the sensor's field of view. When a player is actively tracked, calls to get the next skeleton frame return complete skeleton data for the player. Passive tracking is provided automatically for up to four additional players in the sensor's field of view. When a player is being tracked passively, the skeleton frame contains only limited information about that player's position. By default, the first two skeletons that the skeletal tracking system finds are actively tracked, as shown in Figure 4.

Figure 4.  Figure 4. Active tracking for two players

The runtime returns skeleton data in a skeleton frame, which contains an array of skeleton data structures, one for each skeleton that the skeletal tracking system recognized. Not every skeleton frame contains skeleton data. When skeleton tracking is enabled, the runtime signals a skeleton event every time it processes a depth frame, as described in the previous section.

For all returned skeletons, the following data is provided:

  • The current tracking state of the associated skeleton:
    • For skeletons that are passively tracked, this value indicates position-only tracking.
    • For an actively tracked skeleton, the value indicates skeleton-tracked.
  • A unique tracking ID that remains assigned to a single player as that player moves around the screen.

The tracking ID is guaranteed to remain consistently applied to the same player for as long as he or she remains in the field of view. A given tracking ID is guaranteed to remain at the same index in the skeleton data array for as long as the tracking ID is in use. If the tracking ID of the skeleton at a particular index in the array changes, one of two things has happened: Either the tracked player left the field of view and tracking started on another player in the field of view, or the tracked player left the field of view, then returned, and is now being tracked again.

  • A position (of type Vector4) that indicates the center of mass for that player. This value is the only available positional value for passive players.
  • For the actively tracked players, returned data also includes the current full skeletal data.
  • For the passively tracked players, returned data includes only basic positional and identification data, and no skeletal data. 
NUI Transformations

This section provides a brief overview of the various coordinate systems that are used with skeleton tracking and the API support that is provided for transformations between these spaces.

Depth Image Space

Image frames of the depth map are 640x480, 320×240, or 80x60 pixels in size. Each pixel represents the Cartesian distance, in millimeters, from the camera plane to the nearest object at that particular x and y coordinate, as shown in Figure 5. A pixel value of 0 indicates that the sensor did not find any objects within its range at that location.

Figure 5.  Figure 5. Depth stream values

The x and y coordinates of the image frame do not represent physical units in the room, but rather pixels on the depth imaging sensor. The interpretation of the x and y coordinates depends on specifics of the optics and imaging sensor. For discussion purposes, this projected space is referred to as the depth image space.

Skeleton Space

Player skeleton positions are expressed in x, y, and z coordinates. Unlike the coordinate of depth image space, these three coordinates are expressed in meters. The x, y, and z axes are the body axes of the depth sensor. This is a right-handed coordinate system that places the sensor array at the origin point with the positive z axis extending in the direction in which the sensor array points. The positive y axis extends upward, and the positive x axis extends to the left (with respect to the sensor array), as shown in Figure 6. For discussion purposes, this expression of coordinates is referred to as the skeleton space.

Figure 6.  Figure 6. Skeleton-space coordinate system for the sensor array

Placement of the sensor array affects the images that the camera records. For example, the camera might be placed on a surface that is not level or the sensor array might be vertically pivoted to optimize the sensor's field of view. In these cases, the y-axis of the skeleton space is usually not perpendicular to the floor or parallel with gravity. In the resulting images, people that are standing up straight could appear to be leaning.

Floor Determination

Each skeleton frame also contains a floor clip plane vector, which contains the coefficients of an estimated floor plane equation. The skeleton tracking system updates this estimate for each frame and uses it as a clipping plane for removing the background and segmentation of players. The general plane equation is:

  
Ax + By + Cz + D = 0

where:

  A = vFloorClipPlane.x 
  B = vFloorClipPlane.y 
  C = vFloorClipPlane.z 
  D = vFloorClipPlane.w

The equation is normalized so that the physical interpretation of D is the height of the camera from the floor, in meters. It is worth noting that the floor might not always be visible. In this case, the floor clip plane is a zero vector. The floor clip plane can be found in the vFloorClipPlane member of the NUI_SKELETON_FRAME structure in the native interface and in the SkeletonFrame.FloorClipPlane field in the managed interface.

Skeletal Mirroring

By default, the skeleton system always mirrors the user who is being tracked. For applications that use an avatar to represent the user, such mirroring could be desirable if the avatar is shown facing into the screen. However, if the avatar faces the user, mirroring would present the avatar as backwards. Depending on its requirements, an application can create a transformation matrix to mirror the skeleton and then apply the matrix to the points in the array that contains the skeleton positions for that skeleton. The application is responsible for choosing the proper plane for reflection.

저작자 표시 비영리 동일 조건 변경 허락
크리에이티브 커먼즈 라이선스
Creative Commons License
posted by deviAk

Chapter 5.1 Ase Materal

Study/ASE 2008/09/30 12:33

 D3D와 3D Max는 Matrerial에 대해서 다른 개념을 가지고 있다.

< 3D Max와  D3D Material의 차이점 >

  1. 3D Max의 Material은 D3D Material + D3D Texture
     

  2. 3D Max의 Material은 다층 구조 Material
     D3D는 Material이 하나의 Material정보만을 가지고 있다. 그러나 3D Max에서는 Material이 하나의 Material이 여러 개의 Sub Material을 가질 수 있다. 그리고 그 Sub Material은 다시 또 하나의 Material로 인식되어 자신의 Sub Material을 가질 수 있다.


  3. 다양한 3D Max의 Material
     3D Max의 Material은 다양한 계층구조 방법과 이론적으로 다양한 방법의 계산법을 제공한다. 필요에 따라 프로그래머가 제작할 수도 있다.
     물론 D3D에서도 Shader를 사용하게 되면 3D Max와 같은 다양한 형태의 Material을 구현할 수 있지만 기본적으로 실시간 시스템이어야 한다는 단점으로 3D Max의 다양한 Material의 구현은 실질적으로 힘들다고 할 수 있다.


저작자 표시 비영리 동일 조건 변경 허락
크리에이티브 커먼즈 라이선스
Creative Commons License

'Study > ASE' 카테고리의 다른 글

Chapter 5.1 Ase Materal  (0) 2008/09/30
Chapter 4.3 Local Transform Matrix  (0) 2008/09/29
Chapter 4.2 Node TM 해석  (0) 2008/09/29
Chapter 4.1 3D Max에서의 Node & Node의 전반적인 구조  (0) 2008/09/28
Chapter 3.1 참고자료  (0) 2008/09/26
Chapter 3.1 ASCII Export란?  (0) 2008/09/26
Chapter 2.1 Lexer & Parser  (0) 2008/09/25
Chapter 1.2 ASE File의 소개  (0) 2008/09/25
Chapter 1.1 다양한 데이터 출력 방법  (0) 2008/09/25
posted by deviAk

 Node TM에서 추출된 TM은 World 상의 변환 정보이다.

< Object의 Pivot >
 모든 Object들은 자신만의 Pivot이 존재한다. Pivot이란 Object 자신의 중심점을 의미한다. 이 중심점을 기준으로 한 좌표계를 Local 좌표계라 한다. 또 Local transform Matrix란 자신의 부모 Node의 Pivot과 자신의 Pivot과의 상대적인 Transform Matrix라 한다.
 Node Transform Matrix는 원점을 기준으로 한 Transform Matrix라면 Local Transform Matrix는 자신의 부모를 기준으로 한 Transform Matrix라 할 수 있다.
 일반적으로 NodeTm을 얻을 때 World Transform Matrix에 해당하는 NodeTM 자체와 함께 부모와 상대적인 Transform을 의미하는 Local Transform Matrix를 모두 구하는 것이 일반적이다. 실질적으로 사용하게 되는 Transform matrix는 Local Transform Matrix가 된다.

< LTM ( Local Transform Matrix ) 구하기 >
 LTM을 구하는 방법은 자신의 Node TM에 부모의 Node TM을 곱해 얻는다.

 Local TM = Node TM * Parent Node TM


저작자 표시 비영리 동일 조건 변경 허락
크리에이티브 커먼즈 라이선스
Creative Commons License

'Study > ASE' 카테고리의 다른 글

Chapter 5.1 Ase Materal  (0) 2008/09/30
Chapter 4.3 Local Transform Matrix  (0) 2008/09/29
Chapter 4.2 Node TM 해석  (0) 2008/09/29
Chapter 4.1 3D Max에서의 Node & Node의 전반적인 구조  (0) 2008/09/28
Chapter 3.1 참고자료  (0) 2008/09/26
Chapter 3.1 ASCII Export란?  (0) 2008/09/26
Chapter 2.1 Lexer & Parser  (0) 2008/09/25
Chapter 1.2 ASE File의 소개  (0) 2008/09/25
Chapter 1.1 다양한 데이터 출력 방법  (0) 2008/09/25
posted by deviAk

Chapter 4.2 Node TM 해석

Study/ASE 2008/09/29 11:56

 Node TM은 Node 정보에 있어서 가장 기본적이면서도 가장 중요한 정보 중 하나이다. Node TM에 많은 정보가 있지만 해석하는 과정이 까다로운 부분 중 하나이다.

*NODE_TM {
// Node의 이름
*NODE_NAME    "Box01"

// Inherit 정보
*INHERIT_POS    0 0 0
*INHERIT_ROT    0 0 0
*INHERIT_SCL    0 0 0

// Affain된 TM
*TM_ROW0    1.0000  0.0000  0.0000
*TM_ROW1    0.0000 -0.0000  1.0000
*TM_ROW2    0.0000 -1.0000 -0.0000
*TM_ROW3    0.2514  0.0000  0.0000

// Decomp Affaine된 TM
*TM_POS           0.2514 0.0000 0.0000  
*TM_ROTAXIS       -1.0000 0.0000 0.0000
*TM_ROTANGLE      1.2785
*TM_SCALE          1.0000 1.0000 1.0000
*TM_SCALSCALEAXISE    0.0000 0.0000 0.0000 
*TM_SCALEAXISANG       0.0000
}


< Node Name >
 Node 의 이름이다. Camera Object와 같은 것은 Node Tm을 2개를 가질 수 있다. 이럴 경우 2개의 Node Tm을 구분하기 위해 Node TM의 이름이 필요하다.
 Node Name은 특별한 의미가 없지만 Node TM이 2개이고 그에 따른 애니메이션 정도가 있을 경우 어떤 Node TM에 대한 애니메이션을 구분하는 정보로 주로 사용된다.

< Node Inheriance >
 Node TM의 상속정보이다. 잘 사용하지 않는다.

< Node Transform >
 가장 핵심적인 부분이라 할 수 있다. Node Transform의 정보는 두 가지 형태로 저장되어 있다. 하나느 Scale, Rotation, Translation을 모두 곱하여 Matrix 형태로 저장한 부분과 Transform 정보를 분해해 Scale, Rotation, Position 정보를 저장한 정보 두 가지가 있다. 그러나 이 두 가지 형태는 기본적으로 같은 Transform을 기반으로 해 출력된 정보라 값은 모두 동일하다.

 TM_ROW1에서 TM_ROW4로 출력되는 4개의 줄이 Node Transform Matrix의 각 줄에 해당하는 값이다. 단 여기서 각 ROW의 4번째 열은 출력되지 않고 3개의 값만을 가지고 있다. 이 4번째 열 0, 0, 0, 1이라는 값으로 고정적으로 들어가므로 생략되었다.


  1. Negative Scale의 확인
     Negative Scale이란 Scale 값이 음수를 가진다는 것이다. 3D Max의 작업상 Mirroring을 하여 작업하면 Negative Scale이 된다. 이런 Negative Scale의 경우 일반적인 경우에는 문제가 되지 않지만 상황에 따라 normal 처리나 혹은 애니메이션 처리에 문제 되는 경우가 있다. 이를 위해서 상황에 따라 Negative Scale을 확인해 적절한 처리가 필요한 경우가 존재한다.
     Negative Scale의 확인 과정은 간단하다. TM에서 Rotation을 나타내는 ROW1~ROW3에 해당하는 것이 각각 x, y, z축을 나타내므로 이 중 두 축을 '외적'한 값이 다른 한 축과 방향이 반대인지 혹으 ㄴ같으닞를 확인하면 된다. 이것을 판단하기 위해 두 축을 '외적' 한 값과 다른 한 축을 '내적'을 하여 그 값이 음수이면 축이 반대이고 양수이면 같은 방향이다.


  2. 좌표계 변환
     Max의 오른손 좌표계와 Z-Up을 DX의 왼손 좌표계와 Y-Up으로 변환하려면 Y와 Z에 해당하는 두 값만을 바꿔 주면 된다. 그리고 ROW2와 ROW3도 두 값을 바꾸어 줘야만 한다.

    1. X와 Z를 바꾼다.

    2. ROW2와 ROW3를 바꾼다.

    3. 최종결과

< 분해된 Transform >
 ROW1~ROW4로 출력된 정보 이후에 분해된 Transform 정보가 출력된다. 이 정보는 ROW1~ROW4의 값을 Position, Rotation, Scale 값으로 분해에 저장한 것이다.

  1. Position 값
     TM_POS의 값은 이동 정보로 ROW3의 값과 동일하다.

  2. Rotation 값
     TM_ROTAXIS와 TM_ROTANGLE는 회전 정보를 출력한 것을 Eular Angle의 형태로 출력되어 있다. TM_ROTAXIS는 회전 출을 나타내며 TM_ROTANGLE는 회전축을 기준으로 한 회전 각도를 나타낸다.

  3. Scale 값
     Scale의 값은 TM_SCALE에 각각 x, y, z 축에 대한 확대축소 값을 나타낸다.
     Scale은 기준의 x, y, z축을 기준으로 한 Scale이 아니라 Scale Axis를 기준으로 한 Scale 값이다. 그러므로 이 값으로 TM을 만들기 우해서는 Scale Axis의 회전만큼 먼저 반대로 회전한 이후 SCale을 적용시키고 그 다음에 다시 sCale Axis만큼 회전시켜 원상복구 시키는 과정을 해야만 한다.

  4. 분해된 Translation Matrix 합하기
     각자 계산도니 Postion, Rotation, Scale Matrix를 모두 합해 하나의 TM으로 만들기 위해서 곱해주면 된다.

     NodeTM = ScaleTM * RotationTM * PositionTM
     
  5. DX용 Node TM 만들기
     * DX좌표계로 바꾸기 위해서 미리 y, z 축을 바꾸었다면 그것을 만들어진 TM과 그 곱은 다시 다른 조작을 할 필요가 없다.
     

저작자 표시 비영리 동일 조건 변경 허락
크리에이티브 커먼즈 라이선스
Creative Commons License

'Study > ASE' 카테고리의 다른 글

Chapter 5.1 Ase Materal  (0) 2008/09/30
Chapter 4.3 Local Transform Matrix  (0) 2008/09/29
Chapter 4.2 Node TM 해석  (0) 2008/09/29
Chapter 4.1 3D Max에서의 Node & Node의 전반적인 구조  (0) 2008/09/28
Chapter 3.1 참고자료  (0) 2008/09/26
Chapter 3.1 ASCII Export란?  (0) 2008/09/26
Chapter 2.1 Lexer & Parser  (0) 2008/09/25
Chapter 1.2 ASE File의 소개  (0) 2008/09/25
Chapter 1.1 다양한 데이터 출력 방법  (0) 2008/09/25
posted by deviAk

 3D Max의 Object들은 계층적(Hierarchy) 구조를 가지고 있다. 각 Object들은 하나의 부모(Parent)를 가질 수 있고, 또 다수의 자식(Child)을 가지고 있다. 즉 3D Max의 Object 역시 가장 일반적인 구조인 트리(Tree) 형태의 계층적 구조를 가지고 있다는 뜻이다.

 3D Object의 Object는 다양한 종류가 있다. 3D 메시정보를 가지고 있는 GeoObject, 선의 정보를 가지고 있는 Shape Object, 광원정보를 가지고 있는 Light Object, 카메라 정보를 가지고 있는 Camera Object 그리고 기타 정보를 가지고 있는 Help Object 등 다양한 Object가 있다.
 이들은 모두 기본적으로 Node의 속성을 가지고 있다. Node의 기본적인 속성인 부모 Node에 대한 정보를 가지고 있으며 물론 자신도 다른 Node의 부모가 될 수 있다. 그 외에 기본적인 속성들과 추가적으로 자신만의 정보를 가지고 있다.


*GEOMOBJECT {              // 1. Node의 종류
*NODE_NAME  "Name"        // 2. Node의 이름
*NODE_PARENT "Parent_Name"   // 3. 부모 Node의 이름
*NODE_TM {            // 4. Node Transform Matrix
...
}

*MESH {
...
}

*PROP_MOTIONBLUR 0
*PROP_CASTSHADOW 1
*PROP_RECVSHADOW 1
*TM_ANIMATION {         // 5. Node TM에 대한 Animation
...
}
}


Node Name
 Node의 이름은 너무나 당연한 말이다. Node를 구분하기 위해서 Node의 이름을 가지게 되고 이 이름으로 각각의 Node를 구분하는 용도로 사용하게 된다.

Parent Node
 자신의 부모 Node를 의미한다.

Node Transform Matrix
 객체의 World상의 Transform 정보를 의미한다. 일반적으로 말하는 World Tansform Matrix가 된다.
 Node TM은 크게 4부분으로 나뉘어져 있다.
  1. Node의 이름 정보
  2. Node의 상속관계를 나타내는 Inheritance 정보
  3. TM 대한 정보
  4. TM을 나눠 놓은 정보

 각 Node의 TM에 대한 애니메이션 정보를 가질 수 있다. 애니메이션 정보는 이동, 회전, 스케일에 대해 각각 애니메이션 정보를 가질 수 있다. 물론 애니메이션이 전혀 없을 수도 있다.
 애니메이션 정보는 공통적으로 가질 수 있는 Node TM에 대한 TM뿐만 아니라 상황에 따라서 다른 종류의 애니메이션이 추가될 수도 있다. 또 TM이 2개가 있다면 애니메이션 역시 각각에 대해서 하나씩 가질 수 있다.
크리에이티브 커먼즈 라이선스
Creative Commons License

'Study > ASE' 카테고리의 다른 글

Chapter 5.1 Ase Materal  (0) 2008/09/30
Chapter 4.3 Local Transform Matrix  (0) 2008/09/29
Chapter 4.2 Node TM 해석  (0) 2008/09/29
Chapter 4.1 3D Max에서의 Node & Node의 전반적인 구조  (0) 2008/09/28
Chapter 3.1 참고자료  (0) 2008/09/26
Chapter 3.1 ASCII Export란?  (0) 2008/09/26
Chapter 2.1 Lexer & Parser  (0) 2008/09/25
Chapter 1.2 ASE File의 소개  (0) 2008/09/25
Chapter 1.1 다양한 데이터 출력 방법  (0) 2008/09/25
posted by deviAk

Chapter 3.1 참고자료

Study/ASE 2008/09/26 15:24
2008/09/26 - [Ψ Programing Book/Δ 3D Data Export] - Chapter 3.1 ASCII Export란?

ASE 파일은 크게 두 가지 정보를 저장한다.

  1. 매터리얼 정보
     X 파일 포맷에 비해 상당히 맣은 정보가 저장 되게 된다. 이 정보 중 대부분은 실시간 랜더링을 하는 게임과는 맞지 않는 부분이 있지만, 유용한 정보도 많으므로 적당히 선별해서 읽어들여야 한다.

  2. 메시 정보
 하나의 모델은 하나 또는 그 이상의 메시로 이루어지는데 애니메이션 되지 않는다면 하나의 메시로 만드는 것이 훨씬 좋지만 어쩔 수 없이 여러개의 메시로 나누어야 하는 경우도 생긴다.

 매터리얼의 특징은 서브 매터리얼이란 개념이다. 서브 매터리얼 개념은 x 포맷에는 없는 개념으로 ASE에만 있는 개념이다. 서브 매터리얼은 하나의 매터리얼은 하나의 매터리얼 안에 여러 개의 매터리얼 즉 서브 매터리얼이 존재하는 것이다.

 3D Max에서 하나의 메시는 하나의 매터리얼 밖에 가지지 못한다. 이럴 경우, 하나의 메시를 여러 가지 매터리얼을 사용하고자 하는경우에는 어려움을 겪게 되는데, 3D Max에서는 이것을 서브 매터리얼 개념을 사용하여 극복하였다, 즉, 메시는 하나의 매터리얼을 가지고 이 매터리얼에 메시에서 사용되는 수많은 매터리얼을 서브 매터리얼로 저장하는 방식이다.

크리에이티브 커먼즈 라이선스
Creative Commons License

'Study > ASE' 카테고리의 다른 글

Chapter 5.1 Ase Materal  (0) 2008/09/30
Chapter 4.3 Local Transform Matrix  (0) 2008/09/29
Chapter 4.2 Node TM 해석  (0) 2008/09/29
Chapter 4.1 3D Max에서의 Node & Node의 전반적인 구조  (0) 2008/09/28
Chapter 3.1 참고자료  (0) 2008/09/26
Chapter 3.1 ASCII Export란?  (0) 2008/09/26
Chapter 2.1 Lexer & Parser  (0) 2008/09/25
Chapter 1.2 ASE File의 소개  (0) 2008/09/25
Chapter 1.1 다양한 데이터 출력 방법  (0) 2008/09/25
posted by deviAk

Chapter 3.1 ASCII Export란?

Study/ASE 2008/09/26 12:41
2008/09/26 - [Ψ Programing Book/Δ 3D Data Export] - Chapter 3.1 참고자료

3D Max에서 데이터를 게임에서 사용하기 위해서 추출하는 방법 중에 하나가 ASCII Export이다.
ASE는 원래 Max의 플로그인으로 제작되어 있다. 즉, 파일을 외부로 Export하는 플러그인이 Max SDK로 제작된 것이다.
이 ASE 플러그인 소스는 Max의 Max SDK의 예제 소스로 제공해 준다. 따라서 필요한 경우 이 소스를 수정하여 사용할 수 있다.

ASE의 전반적인 구조
  1. File Head
     ASE 파일이 Version 정보나 Comment 등의 정보를 담고 있다.

  2. Scene
     Scene에 대한 전반적인 정보를 담고 있다.
     버전정보나 전체 프레임수 등 ASE의 기본적인 정보를 표시해 준다.

  3. Material List
     사용된 Material들의 List 이다.
     Object 중 GeoObject에서 사용하는 Material을 List형태로 나열해 놓았으며 각 Material에는 번호를 붙여 놓아서 GeoObject에서 이 번호를 참조해 어던 Material을 사용하는지 알아내도록 되어 있다.

  4. Object List
     각종 Object들의 List, GeoObject, ShapeObject, LightObject, CameraObject, HelpObject 등이 있으며 Group으로 묶어질 수 있다. Object는 쉽게 말해서 장면들을 구성하는 각종 객체들이라고 할 수 있다. Face로 구성된 GeoObject에서부터 선을 나타내는 ShapeObject, 광원, 카메라 기타 도움을 주는 Object등 다양한 형태의 Object들이 계층 구조를 가지고 있다.


< Geo Object >

 일반적인 Mesh를 가진 객체를 말한다. 가장 핵심적인 Object라고 할 수 있다.
 Mesh를 가지고 있으며 Mesh는 Face의 모임으로 구성되어 있다. 또 Face는 3개의 Vertex로 이루어져 있으며 다양한 형태의 Vertex들로 구성되어 있다.
 이 부분의 개념이 D3D와 많은 차이가 난다. D3D에서는 모든 Vertex들이 하나로 뭉쳐서 Vertex를 이루지만 3D Max에서는 좌표정보를 가진 Vertex, Texture좌표를 가진 Vertex 등 다양한 종류의 Vertex로 나뉘어 있다.

< Shape Object >

 선을 가진 객체를 의미 한다. 와이어만으로 객체를 형성한 것으로 여러 개의 끊어진 선으로 출력된다.
 D3D에서 보자면 LINE_LIST나 LINE_STRIP 등에 해당하는 것으로, 하나의 Line은 두개의 Vertex로 구성되어 있으며 Mesh와 같이 Vertex와 Index로 나뉘어져 있지 않고 그냥 Vertex로만 구성되어 있다. 단 선의 굵기를 설정할 수 있는데 이 부분을 제대로 처리하기에는 D3D가 약간 부족한 면이 있다.

< Light Object >

 광원에 대한 객체를 의미한다. 말 그대로 광원을 의미하는 것으로 D3D에 비해서 다양한 형태의 광원을 만들 수 있다.
 물론 이러한 광원들을 모두 D3D에서 그대로 옮겨서 사용할 수는 없다. 다양한 종류의 Attenuation, 다양한 형태의 광원 모양 등 다양한 파라미터로 구성되어 있기 때문에 D3D로 변환 할 때 어느 정도의 융통성이 필요로 한 부분이다.

< Camera Object >

 카메라에 대한 객체를 의미한다. 카메라는 D3D에서 View와 Projection Matrix을 결정하는 부분으로 역시 D3D에 비해서 다양한 옵션을 지원한다.

< Help Object >

 Group이나  Object에 대한 부수적인 정보를 가진 Object라고 할 수 있다.

< Group >

 Group은 자체로써 객체는 아니다. 단지 여러 개의 Object들을 묶어 놓은 것을 의미한다. 또 Group은 다층이 가능하다. 즉 Group안에 다시 Group이 올 수도 있다는 뜻이다.
 Group은 여러 개의 객체를 묶어 놓은 것으로 하나의 Node로 취급될 수 있는데 이것은 Help Object가 대신해 준다. Group과 똑같은 이름의 Help Object가 존재해서 이것이 Group에 속해 있는 모든 Object들의 최상위 부모 Object로 설정이 되는 것이다.
크리에이티브 커먼즈 라이선스
Creative Commons License

'Study > ASE' 카테고리의 다른 글

Chapter 5.1 Ase Materal  (0) 2008/09/30
Chapter 4.3 Local Transform Matrix  (0) 2008/09/29
Chapter 4.2 Node TM 해석  (0) 2008/09/29
Chapter 4.1 3D Max에서의 Node & Node의 전반적인 구조  (0) 2008/09/28
Chapter 3.1 참고자료  (0) 2008/09/26
Chapter 3.1 ASCII Export란?  (0) 2008/09/26
Chapter 2.1 Lexer & Parser  (0) 2008/09/25
Chapter 1.2 ASE File의 소개  (0) 2008/09/25
Chapter 1.1 다양한 데이터 출력 방법  (0) 2008/09/25
posted by deviAk

Chapter 2.1 Lexer & Parser

Study/ASE 2008/09/25 15:59

ASE Lexer(구문해석기) & Parser(어휘해석기)

 Lexer는 Scanner라고도 하는데 문법을 가진 문장을 TOKEN단위로 잘라 주는 역할을 해 주는 것을 말한다. 컴파일(Compile)을 하는데 가장 먼저라고 할 수 있다.

*3DSMAX_ASCIIEXPORT 200
*COMMENT "AsciiExport Version 2."
*SCENE {
}

 위의 문장을 '*3DSMAX_ASCIIEXPORT', '200', '*COMMENT', "AsciiExport Version 2.", '*SCENE', '{', '}' 로 잘라서 하나 하나를 TOKEN으로 만들어 주는 것이 Lexer 이다.

 Paser란 이렇게 잘라진 TOKEN을 문법이 맞는지 검사하는 것이라 할 수 있다.


크리에이티브 커먼즈 라이선스
Creative Commons License

'Study > ASE' 카테고리의 다른 글

Chapter 5.1 Ase Materal  (0) 2008/09/30
Chapter 4.3 Local Transform Matrix  (0) 2008/09/29
Chapter 4.2 Node TM 해석  (0) 2008/09/29
Chapter 4.1 3D Max에서의 Node & Node의 전반적인 구조  (0) 2008/09/28
Chapter 3.1 참고자료  (0) 2008/09/26
Chapter 3.1 ASCII Export란?  (0) 2008/09/26
Chapter 2.1 Lexer & Parser  (0) 2008/09/25
Chapter 1.2 ASE File의 소개  (0) 2008/09/25
Chapter 1.1 다양한 데이터 출력 방법  (0) 2008/09/25
posted by deviAk

Chapter 1.2 ASE File의 소개

Study/ASE 2008/09/25 14:49

ASE 파일이란 3D 데이터를 ASCII 형태로 출력한 파일이다.

ASE 파일을 사용하는 이유
  1. ASE는 이해가 쉽다.
     일반 ASE로 출력한 데이터의 경우 이해가 쉽다. Binary 파일로 저장된 경우 그 값을 읽기가 쉽지 않다. 하지만 ASE는 Text 형태이므로 값들을 직접 볼 수 있으므로 쉽게 파악을 할 수 있다.

  2. 필요할 경우 조작이 쉽다.
     가장 좋은 점 중에 하나로 Text 형태의 가장 큰 특징이라고 할 수 있다. 필요할 경우 출력된 ASE 파일에서 특정한 데이터를 간단하게 없애버리거나 추가하거나 하는 것이 자유롭다.
     이는 프로그램을 테스트할 때 상당히 유용하다. 자신이 특정 엔진을 제작 할 때 필요한 데이터를 직접 조작할 수 있다는 점은 엄청나게 편리함을 준다.

  3. ASE에는 많은 내용을 담고 있다.
     ASE를 교육용이나 학습용으로 가장 많이 사용하는 이유 중에 하나이다. 일반적으로 3D Max의 3D 데이터 형태를  D3D와 같은 API와 상당히 많이 다른 형태를 가지고 있다.
     그리고 3D Max만의 독자적인 형태의 데이터나 구조가 존재한다. 하지만 이는 SDK를 막 공부해서는 자료가 부족할 뿐만 아니라 Max가 담고 있는 그 세부적인 구조에 대해서는 제대로 알 기회가 없다.
     ASE 에는 3D Max의 수많은 기능과 구조를 담은 다양한 형태의 정보들이 저장되어 있어 학습하는 과정에서 구조의 파악과 기능의 파악에 상당히 도움이 된다. 따라서 3D Max의 Export를 공부하는 과정에서 ASE 파일을 사용해 구체적인 구조와 형태에 대해서 쉽게 학습할 수 있는 장점이 있다.

ASE의 한계
  1. 대규모 데이터의 처리에 한계가 있다.
     ASE 파일은 텍스트 형태라 같은 데이터라도 Binary에 비해 그 크기가 엄청나게 방대하다. 또 추가적인 구분을 위한 텍스트 까지 포함하으로 그 데이터는 실로 엄청나다. 따라서 대규모 데이터의 경우 ASE를 이용해 Parsing을 하는 것 자체가 잘못된 선택이다.

  2. 추가적인 에디터나 Parser가 필요하다.
     ASE는 텍스트로 출력이 되므로 프로그램에서 사용하려면 그 텍스트를 읽어들일 추가적인 Parser가 필요하다. 이는 역시 직접 프로그래밍하여 제작하여야 한다. 또 실제 게임에서 사용하기 위해서는 ASE 파일을 읽어들여 Parsing을 한 이후에 각종 처리를 하여 게임에서 사용할 Binaryt 파일로 저장할 툴이 필요할 것이다.

  3. 꼭 필요한 데이터 중  ASE에 없는 데이터가 있다.
     게임에서 많이 사용되는 데이터지만 ASE에는 포함되어 있지 않는 데이터가 있다. (애니메이션을 위한 Tick 간격이나 Skinning을 위한 Bone 이나 Weight 정보 등) ASE 출력부분도 Max SDK를 사용하므로 Max SDK를 이용해 ASE 출력부분을 수정, 사용하는 등의 다른 방법 등이 필요하다.


 ASE 에서 출력 되는 데이터는 기본적으로 우리가 게임에서 사용하는 데이터와 그 형태와 내용이 다를 것이다. 그래서 그 데이터를 읽어 들여 다양한 변형이 필요하다. Max SDK를 사용할 경우 출력 시부터 처리를 할수 있는 내용으로 ASE를 사용하면 복잡한 처리를 해야 하는 경우가 종종 있다.


크리에이티브 커먼즈 라이선스
Creative Commons License

'Study > ASE' 카테고리의 다른 글

Chapter 5.1 Ase Materal  (0) 2008/09/30
Chapter 4.3 Local Transform Matrix  (0) 2008/09/29
Chapter 4.2 Node TM 해석  (0) 2008/09/29
Chapter 4.1 3D Max에서의 Node & Node의 전반적인 구조  (0) 2008/09/28
Chapter 3.1 참고자료  (0) 2008/09/26
Chapter 3.1 ASCII Export란?  (0) 2008/09/26
Chapter 2.1 Lexer & Parser  (0) 2008/09/25
Chapter 1.2 ASE File의 소개  (0) 2008/09/25
Chapter 1.1 다양한 데이터 출력 방법  (0) 2008/09/25
posted by deviAk